Table of Contents
- CHECKS AND DEPOSITS
- Overview
- Check/Deposit Functions
- Standard Templates
- Canada vs USA Versions
- Check/Deposit Processing
- PDF Output
- Definition
- Maintain Functions (IMFN)
- Maintain Form Definitions (IMFD)
- Define Parameters (IMPM)
- Define LOV Queries (IMLQ)
- Report Launch
- Report Criteria Tab
- Report Options Tab
- Check / Deposit Output
- Setup Form
- Check/Deposit Forms
- Pay Stub Details
- Check / Deposit Slips
- Execution Run Logs
- Final Page
- Configuration
- Client Tailoring
- Customization
- Frequently Asked Questions
- Notes
CHECKS AND DEPOSITS#
Overview#
In Personality, the checks and deposits have been redeveloped using Windward Reports. Report templates have been prepared using Microsoft Word and .docx formatted files. These report templates make extensive use of Windward tags for accessing data and applying logic and rely heavily on Word styles and formatting for presentation. The checks and deposits are launched from Personality in the traditional way with appropriate run time parameters. At run time, the chosen data is merged with the report template to produce output in PDF form.Check/Deposit Functions#
New functions named UPSTUBCW and UPSTUBDW have been created for the checks and deposits respectively. These functions use pay disbursement information, as seen on the IPDS screen. Unlike prior versions of checks and deposits, it is expected that these two functions will be able to be used for most clients, even if the report templates have been tailored.Standard Templates#
Several standard templates have been developed to handle the most popular checks and deposits layouts:Checks
| UPSTUBCW-8X11.docx | One Page, Letter size (8.5" x 11") check - .25" margins (system default template) |
| UPSTUBCW-8X11_CT.docx | One Page, Letter size (8.5" x 11") check - .25" margins (with Check portion at the top section of the stub page) |
| UPSTUBCW-8X14.docx | One Page, Legal size (8.5" x 14") check - .625" margins for self mailers |
| UPSTUBDW-8X11.docx | One Page, Letter size (8.5" x 11") check - .25" margins (system default template) |
| UPSTUBDW-8X14.docx | One Page, Legal size (8.5" x 14") check - .625" margins for self mailers |
This list may grow over time. New clients should be encouraged to use one of the standard formats. Minor tailoring of the templates can be done through Microsoft Word without programming. As always, customized templates can be developed for clients but these must be quoted as enhancements.
Aside from the size of the form, the content of the letter and legal sized templates is the same. Checks and deposits layouts are also very similar. The check/deposit slip section is slightly different but the pay stub detail section is the same. The legal size mailer forms have an additional section for the address.
The size of the check/deposit slip logo is 79x79 bytes
In the standard templates, the checks/deposit slips (and mailing address for legal size) are printed below the pay stub detail so the perforation is not close to the MICR area. This avoids the possibility of damaging the MICR strip when the check is separated from the stub.
Canada vs USA Versions#
The standard templates handle both Canada and the United States. The only variation is in the spelling of the word "check" and the content of the Tax Filing Section as show below:- Canada

- USA

The country is determined from the pays.
Check/Deposit Processing#
Windward checks and deposits are produced in Personality via the report launch screen like all other reports. Since UPSTUBCW and UPSTUBDW are "Windward Only" functions, the Run Language defaults to "Windward Reports" and cannot be changed.The appropriate report template is selected in one of the following ways:
- By uploading a template that is stored on the user's PC or networked drives.
This is the preferred way of testing new templates. - By using a site specific template that is stored in the HLAppResources\reports\UserDefined directory of the deployed application.
This is the preferred way of running in production. The template must be renamed UPSTUBCW or UPSTUBDW before being placed in this directory.
- By using the default standard template provided with Personality.
The letter sized (8.5" x 11") templates are the system defaults.
PDF Output#
All checks and deposits are printed as PDF files. Adobe Reader is required to view and/or print these files. To properly print the MICR line on the checks, special MICR fonts must be installed on the server and the PC that the checks are printed from and the Adobe Reader document options must be set to "Use Local Fonts".Definition#
The UPSTUBCW and UPSTUBDW functions are defined within Personality on the existing IMFN, IMFD, IMPM and IMLQ forms.Maintain Functions (IMFN)#
Both UPSTUBCW and UPSTUBDW are "pre-defined" report functions that are designed specifically for Windward Reports deployment and can only be run with Windward Reports. The destination format is always "PDF". The subject table is P2K_PR_DISBURSEMENTS.Users must be authorized to run these functions like all other functions in the system. Execution rights may be granted by Role or User.
A PRINT FINAL PAGE preference is supported for these functions. This preference controls the printing of the last page of the report which shows the parameters used during the check/deposit run.
Maintain Form Definitions (IMFD)#
The Table Usages section of the IMFD screen identifies all of the tables that can be accessed by the check/deposit templates. This section defines the "Datasource" that is available to the template. It describes the relationship of the tables and the Where Clause conditions that filter the data. The Table Usages for the UPSTUBCW and UPSTUBDW functions contain both real tables and Java views.The Form Layout section of IMFD identifies the parameters that appear on the report launch screen and it defines how they are grouped. Field look-ups and drill downs are also identified here. Generic report launch fields are defined globally.
Data security is implemented system wide for table usages and form items. Hence, the same security that applies to forms also applies to reports.
The form definitions for UPSTUBCW and UPSTUBDW are "pre-defined".
Define Parameters (IMPM)#
All parameters that are used by UPSTUBCW and UPSTUBDW are defined on IMPM. The prompts that are shown on the report launch screen are taken from IMPM.Define LOV Queries (IMLQ)#
The query that is used to retrieve the list of disbursements that drive the check and deposit processes is defined on IMLQ under the names IMPV_UPSTUBCW and IMPV_UPSTUBDW respectively. This list is filtered based on the parameters entered on the launch screen. The list can be viewed prior to execution by using the View Report List button on the report launch screen.Report Launch #
Check/deposit runs are launched through Personality using a report launch form. At launch time, you must supply the run time parameters and identify which template to use. Check/deposit runs may also be scheduled.Report Criteria Tab#
Report parameters are supplied on the Report Criteria tab of the report launch form. This tab is divided into two sections - Report Parameters and Report Filters. The parameters on UPSTUBCW and UPSTUBDW are identical except for wording.Report Options Tab#
Report run time details are supplied on the Report Options tab of the report launch form. This tab is divided into two sections - Processing Options and Report Scheduling. All of the information on this tab is standard throughout Personality; however, the Upload Template field is used specifically for Windward Reports.The Run Language for UPSTUBCW and UPSTUBDW is always "Windward Reports" and this cannot be changed.
If a user wishes to use a specific template, they must click the folder icon beside the Upload Template field and upload the template from a directory on their computer or a network drive. If no template is uploaded, the system will look for the template using the function name (with an .docx extension – i.e. UPSTUBCW.docx) in the HLAppResources\reports\UserDefined directory of the deployed application. This is where the site specific templates are stored. If no template is found, it will use the system default template.
There is no need to supply any Destination parameters since checks and deposits are always directed to PDF files.
Report scheduling is a system wide feature that can also be used for check/deposit runs.
Check / Deposit Output#
The output of a check/deposit run may consist of a setup form, check/deposit forms, execution run logs and a final page.Setup Form#
With the popularity of Laser printers, the setup form has been removed since it does not serve any meaningful purpose. The Print Setup Form parameter is still available (for use in certain special and customized situations) but is inactive when using the system default templates.Check/Deposit Forms#
Checks are printed for employees who are receiving only a check or a check plus one or more deposits. Deposits are printed for employees who are receiving only deposits.Checks and deposits are divided into two main sections - pay stub details section, check/deposit notification section - and many subsections.
Pay Stub Details#
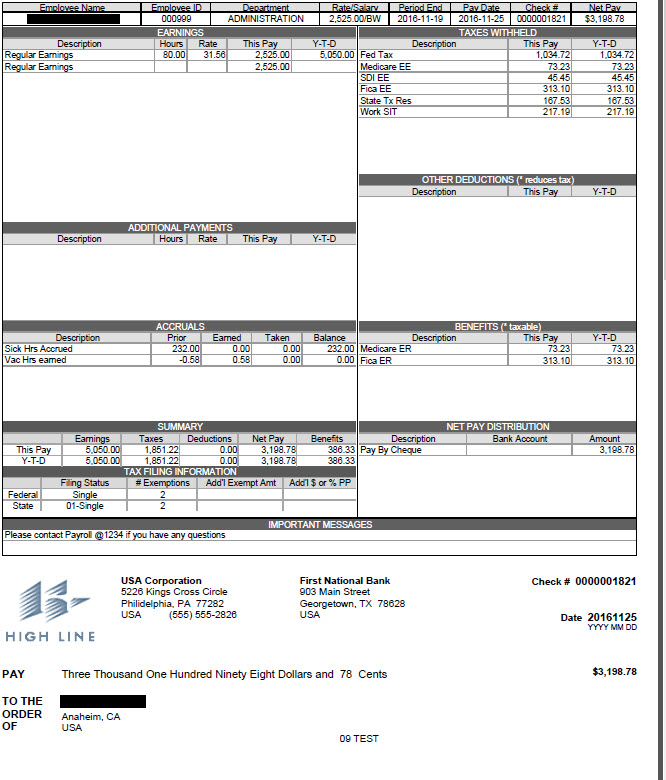
The standard pay stub details section is relatively standard on both checks and deposits.- Standard Pay Stub Detail (US Check version)

This section is also divided into many subsections.
- Identity Line
- The top section identifies the employee and provides basic pay information. The check number only prints on checks not deposits.
- Earnings (default is 14 lines)
- The Earnings section shows all PCs that have current and/or year-to-date values that are defined in the IPPR Earnings element and are not in the Z_STUB_ADD_EARN element. The PCs are listed in element sequence order. Associated time PCs and rates are also shown. The associated Time PC is defined on IPPC for the earnings component.
It is possible that multiple lines show for the same PC with different rates. In that case, the year-to-date values are printed only once. If there are more PCs than will fit in the section, the additional PCs are accumulated and shown on the last line under Other Earnings.
You can turn off the detailed rates by turning off the flag “Detailed Pay Stub” on the IPPR screen.
The 'Earnings' section on the Disbursements may not be presented properly when there are more than one 'input' pay component that generates to the same 'output' earnings Pay Component. These situations can be consolidated into a single earnings line for that Pay Component by following the UPDISB_FORCE_BALANCE setup.
- Additional Payments (default is 6 lines on letter size, 5 lines on legal size)
- The Additional Payments section shows all PCs that have current and/or year-to-date values that are in the Z_STUB_ADD_EARN element. The PCs are listed in element sequence order. Associated time PCs and rates are also shown. It is possible that multiple lines show for the same PC with different rates. In that case, the year-to-date values are printed only once. If there are more PCs than will fit in the section, the additional PCs are accumulated and shown on the last line under Other Payments.
- Taxes Withheld (default is 10 lines on letter size, 9 lines on legal size)
- The Taxes Withheld section shows all PCs that have current and/or year-to-date values that are defined in the IPPR Deductions element and have a PC usage that is part of Canadian or US Legislation. The PCs are listed in element sequence order. If there are more PCs than will fit in the section, the additional PCs are accumulated and shown on the last line under Other Taxes Withheld.
- Other Deductions (default is 10 lines on letter size, 9 lines on legal size)
- The Other Deductions section shows all PCs that have current and/or year-to-date values that are defined in the IPPR Deductions element and have a PC usage that is NOT part of Canadian or US Legislation. The PCs are listed in element sequence order. If there are more PCs than will fit in the section, the additional PCs are accumulated and shown on the last line under Other Deductions.
An asterisk can be used to flag PCs (typically for identifying pre-tax deductions) by specifying these PCs in the Z_STUB_ASTERISK element. The asterisk will appear in front of the PC description.
- Accruals (default is 6 lines on letter size, 5 lines on legal size)
- The Accruals section shows accrual PCs that have been defined in the Z_STUB_AT_EARNED, Z_STUB_AT_TAKEN and Z_STUB_AT_BAL elements. The sequence numbers used in these elements tie the amounts together on a line, so each element must have corresponding sequence numbers in each element for the PCs used for the values. The Prior column is derived as: Balance + Taken – Earned. The description shown (i.e. the policy name) is taken from the PC identified in the Z_STUB_AT_EARNED column.
- Benefits (default is 6 lines)
- The Benefits section shows all PCs that have current and/or year-to-date values that are defined in the IPPR Benefit element. The PCs are listed in element sequence order. If there are more PCs than will fit in the section, the additional PCs are accumulated and shown on the last line under Other Benefits.
An asterisk can be used to flag PCs (typically to represent taxable benefits) by specifying these PCs in the Z_STUB_ASTERISK element. The asterisk will appear in front of the PC description.
- Summary
- The Summary section shows the current total and year-to-date summaries of the sections printed above:
Earnings, Taxes Withheld, Deductions, Net Pay and Benefits.
Net Pay is computed as Earnings – Taxes Withheld – Deductions.
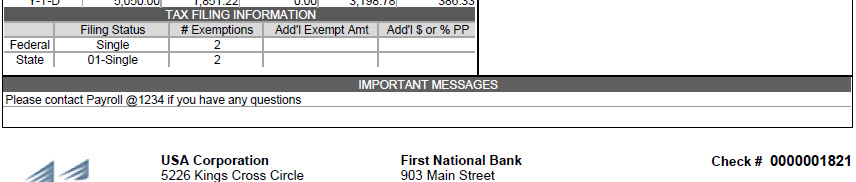
- Tax Filing Information
- The Tax Filing Information section shows specific employee pay rule details for Federal and State/Provincial filings. The content of this section varies depending on whether the country is CAN or USA. The country comes from the jurisdiction identified on the pay headers that make up this check / deposit.
The Tax Filing Information is based on the IPRLU/IPRLUS table as of Pay Period End Date.
- Net Pay Distribution
- The Net Pay Distribution section shows how the net pay is being disbursed to the employee. It may be paid entirely by check, entirely by deposits or some combination thereof. In the case of deposits, the ending portion of the account code is shown for verification. The splits show in pay rule sequence order, as defined in IPPM. Up to six distributions are printed, even though there may be more splits defined in IPPM. (If a disbursement contains multiple pays, i.e. Regular Pay and Bonus Pay, then the Net Pay Distribution section will show a summary of all check/deposit amount from all pays only once).
- Important Messages
- The Important Messages section shows notes that have been associated with the pay. This is done through a special UserCalc that is executed and interpreted at disbursement time (UPDISB).
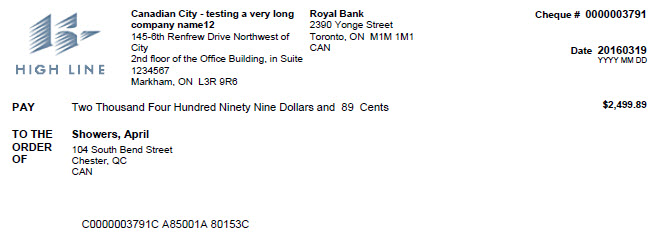
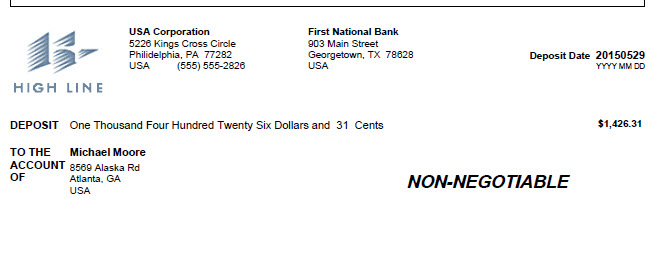
Check / Deposit Slips#
The standard check / deposit slips formats are shown below:- Standard Check Layout

- Standard Deposit Slip

Each of these formats has the following subsections:
- Logo
- At the top left of the form is an area that contains the company logo. This is picked up by default from the site logo preference stored on IMST. The default size of this area is 1" x 1.5" for Letter Size forms and .8" x 1.5" on Legal Size forms.
- Entity Name and Address
- To the right of the logo is the company name and address which is picked up from IDEN.
- Entity Phone Number
- The company phone number is printed on the last line of the company name and address.
- Bank Name and Address
- To the right of the company name and address is the bank name and address which is taken from IPBL for the payroll bank. This is the bank that the funds are drawn from. The bank accounts are defined by payroll on the IPPR screen. Checks and deposits may be withdrawn from different bank accounts.
- ABA Number (also known as routing number or routing transfer number, only on checks)
- The bank's ABA number is printed below the bank name and address on checks. This is taken from the IPBL screen for the payroll bank.
- Check # (only on checks)
- The check number is printed in the top right corner on checks.
- Check/Deposit Date
- The check/deposit date is printed in YYYY MM DD format on the top.
- Amount In Words
- The amount being disbursed is printed in words in the upper middle section immediately following the words "PAY" or "DEPOSIT". This phase is derived from the same PL/SQL code that is used on Oracle Report checks.
- Disbursement Amount
- The amount being disbursed is printed in its numeric form on the right hand side.
- To The Order Of / To The Account Of
- The name and address of the person receiving the funds is printed on the left side below the amount in words.
- Signature (only on checks)
- The signature of the person (or persons) with signing authority is printed on the bottom right hand side of checks. The signature can be picked up in several ways:
- Taken from a graphics media file stored in Personality (like the logo)
This is set up on IPBA for each bank account - Taken from a graphics file embedded in the template
- Supplied by typing the signing officer's name in the template using a secured signature font
(must be on the server and the PC that is doing the printing)
- Signatures are not printed if the amount is zero; "VOID VOID VOID" shows instead.
- NON-NEGOTIABLE (only on deposits)
- The phrase "NON-NEGOTIABLE" is printed instead of a signature on deposits.
- MICR Line (only on checks)
- The banking information is encoded using special MICR fonts in the bottom 5/8" section of checks. The standard font used is the ArchitextMICR1 Windows True Type font, which may be licensed; however clients may have their own Windows True Type font. The MICR font must be installed on the server and the computer that the printing is being done from in order to see the special fonts and the Adobe Reader document options must be set to "Use Local Fonts".
- Special Note (about checks)
- Before any New Check forms enter production, almost all banks required that a test batch of the new check forms to be sent to their clearing facility first to ensure that the new check forms met their specifications and that they pass their check clearing process without any issues.
Execution Run Logs#
The Execution Run Log shows all trace messages generated during the check/deposit run. The Print Run Logs parameter determines whether it is printed. The Exception Level parameter determines how many trace messages are printed. This section is normally only used during troubleshooting.Final Page#
A final page is printed at the end of every check/deposit run that shows the parameters that were used during the run. It also provides the following totals - Total Forms Printed, Total Net Pay. There is a footer on the bottom of the page that show the name of the template, the template version date and the Personality release that was being used at the time of the run. This page can be suppressed by setting the functions PRINT FINAL PAGE preference to "N".Configuration#
The following set up is required prior to running:- PL/SQL procedures: The check/deposit templates use PL/SQL procedures to retrieve information that are not readily available within the template itself. These PL/SQL procedures may not necessarily be used by other functions, but in order for the check/deposit templates to work properly, they must be installed in the data base where check/deposit stubs are to be run:
- P2K_PPAMTS.sql
- P2K_PPMONY.sql
- P2K_PPSTUB_AMTS.sql
- P2K_SPPGMICR_GENERIC.sql
- Make sure that the EARNING, DEDUCTION, and BENEFIT elements are specified on IPPR. (In special situations where client does not want all PCs inside the IPPR defined elements to be listed on the stub, the following elements may be setup to achieve such a purpose, however, a customized stub program will be required).
- Z_STUB_EARN_PCS - PCs to be listed in the Earnings section (these PCs must be a subset of the PCs defined in IPPR Earning element)
- Z_STUB_TAXES_PCS - PCs to be listed in the Taxes Withheld section (these PCs must be a subset of the PCs defined in IPPR Deduction element)
- Z_STUB_DEDN_PCS - PCs to be listed in the Other Deductions section (these PCs must be a subset of the PCs defined in IPPR Deduction element)
- Z_STUB_BENE_PCS - PCs to be listed in the Benefits section (these PCs must be a subset of the PCs defined in IPPR Benefit element)
- You MUST Set up the following new elements (they may be empty, i.e. contains no Pay Components)
- Z_STUB_ADD_EARN - PCs to print in the Additional Payments section
- Z_STUB_ASTERISK-Deduction or Benefit PCs that should have a preceding asterisk
- Z_STUB_AT_EARNED-Leave accrual Earned PCs
- Z_STUB_AT_TAKEN-Leave accrual Taken PCs
- Z_STUB_AT_BAL-Leave accrual Balance PCs
- Make sure the company logo is supplied as the Site Logo in IMST.
- Decide how the signature is to be handled:
- Pick the signature up dynamically from a graphics media file store in Personality (like the logo).
To do this, create a "SIGNATURE" media type on IMEC. Add two new form items (PBA.SIGNATURE and PBA.SIGNATURE_FILE) with prompts to the IPBA screen BANK_INFO tab through IMFD. In IPBA, upload the signature font into the new "Signature" field. Open the check RTF and replace the word "Signature" with the following tag:
<wr:out select="/Data/PCH/PBA_ID/SIGNATURE_FILE" type="BITMAP" nickname="Signature" />
(FUTURE - waiting for technology) - Store the signature as a graphics file embedded in the template.
To do this, open the check .docx file, remove the word "Signature", place the cursor where you want the signature graphic file inserted, then select from the menu Insert/Picture/From File and pick up the graphics file. - Store the signature as a name in the template using a secured signature font.
To do this, open the check .docx file and replace the word "Signature" with the name of the signing individual. Change the font of this field to the signature font. Make sure you have this signature font installed on the server and the computer that will be doing the printing. - Pick up the signature using a URL link.
To so this, open the check RTF and replace the word "Signature" with the following tag:
<wr:import url="…/CheckSignature.gif" nickname="Signature" />
(FUTURE - waiting for technology) - Use as is or leave blank for initial testing.
- Pick the signature up dynamically from a graphics media file store in Personality (like the logo).
- If you want to see the proper MICR font, install the Architext MICR 1 font (or an alternative font) on the report server and the computer you will print from.
- Make sure the WindwardReport.properties file contains the following lines:
font.files=c:/windows/fonts/*.ttf;c:/windows/fonts/*.ttc;
…
pdf.font_level=1
Client Tailoring#
Most clients will be able to use the standard check and deposit templates. They must, however, order their check forms with the right specifications. A considerable amount of effort has been made to include the items of interest to most clients in the standard templates.Nevertheless, a certain amount of tailoring of the template is to be expected.
Always
- Supply the appropriate MICR fonts (or license the Architext MICR fonts)
- Supply the appropriate check signature
- Minor printer adjustments
- Adjust the number of lines in the pay stub subsections - only needed if the standard sizes are not acceptable.
- Remove unwanted sections
- Flip check/deposit slip and pay stub (check/deposit slip on top)
- Alter the sizing and/or placement of the company logo
- Minor wording and spacing changes
- Minor changes in the data shown in the Employee Identification section, Summary section and/or Tax Filing section
- Add new sections and logic
- Remove the Rates from the Earnings section
If clients insist on using totally different check / deposit formats, customized templates will have to be developed and new Java code will likely be needed. These will likely require new functions in Personality
Customization#
For the customizations noted above, you must work within the print “zones” noted below in the 11” sample.| ZONE A | the identification section and is limited to 2 lines, including the labels above. |
| ZONE B | the pay components and is limited to 32 lines, including section headings, “Other xxxx” lines and column headings. Due to margin differences, this is 30 lines on a self-mailing 14” format. |
| ZONE C | the summary section and is limited to 8 lines, including headings and labels |
| ZONE D | the notes section and is limited to 3 lines, including labels |
| ZONE E | the advice section and contains the check instrument or deposit advice. |
You can increase/decrease the size of any of the sections, but the entire zone expands or contracts. For example, if you decrease the accruals section from 6 to 4 lines, then either the earnings/additional payments area must increase by 2 (to take up the spacing) or the right column will also decrease by 2 (taxes/deductions/benefits).
If the right column also decreases, then the two lines lost can be added into zone C or zone D.
Frequently Asked Questions#
- What version of Personality is required?
- Build 4.05.01 or later.
- What version of Windward is required?
- Windward Report libraries and AutoTag version 5.1.8
- What version of Microsoft Word is supported?
- Word 2000 through Word 2007
- What version of Adobe is supported?
- Version 7.x and 8.x
- Do I need to install AutoTag on my PC to print checks/deposits?
- No
- Do I need to install AutoTag on my PC to do simple tailoring?
- No. AutoTag is only needed to change the Windward tags. It is not needed to alter margins, spacing or text. It is not needed to embed graphics files directly into the templates.
- Do clients need MSWORD to print checks/deposits?
- No. MSWORD is only needed for template modifications. Adobe Reader is needed to view and print the PDF’s.
- Can clients use their own MICR font for the MICR line instead of Architext MICR1?
- Yes, but the font must be changed in the template. Please note that all special fonts used must be installed on both the server and the client PC that is used for printing.
- I want to use a “security” font for the numbers or “Pay to the Order of”. Is this possible?
- Yes, but the font must be changed in the template. Please note that all special fonts used must be installed on both the server and the client PC that is used for printing. If you do not have a security font, then a license can be obtained for you.
Example of a security font:
- Can I print special graphic on the check, such as drawing boxes around the check date and check amount?
- The answer to this question is both Yes and No, it all depends on the local bank from which funds are drawn from. (If client wants to change the standard check form format, it is best to obtain the check specification from their local bank to first verify if special graphics/background colors are permitted or recommended, and the specification for doing so).
- Why can I not see the special MICR font in my output?
- It is very likely that there is a setup problem:
- Make sure the special MICR font is installed on the server and the computer that the printing is done from.
- Make sure the Windward.properties file has the following lines in it:
font.files=c:/windows/fonts/*.ttf;c:/windows/fonts/*.ttc;
…
pdf.font_level=1
#Ensure your printer is configured to accept downloaded True Type (Soft) fonts
#Check the PDF output document properties
File / Document / Properties / Fonts - make sure the font is being carried forward
#Make sure your PDF Reader is set to use local fonts
Document / Use Local Font - should be turned on
- How will translations be handled?
- Separate templates will be required where translation is needed. Template text can be translated dynamically depending on the employee's language of preference or shown in both languages. Translated PC abbreviations will be shown instead of the normal abbreviation field. There may be other considerations that need to be addressed. These have to be worked out with the client that requests translation.
- Why are Taxable Earnings no longer shown in the Summary section?
- Taxable Earnings is the base of earnings that taxes are calculated on. There are many bases used during the calculation of pay - Federal, State/Province, Local - FLSA, WC, T4, T4A, RL1, CPP,EI, etc. - so it is a little ambiguous. Instead of showing the Federal Tax Base for normal earnings, this section now shows the totals of the other sections on the pay stub.
