Table of Contents
- GENUS CLOCK APPLICATIONS
- Clock Types and Applications
- G1 Clock Type
- G2 Clock Type
- Configuration Attributes
- Application Configuration
- Terminal Configuration
- Web Configuration
- Database Configuration - NOT USED!
- Loading Clock Software
- Clock Rebooting
- Usability Configuration
- Functionality
- Idle Screen
- Punching IN and OUT
- Employee Verification
- Administration Screen
- Enroll
- Remove
- Check Queue Size
- Test Queue Capacity
- Clear All
- Clock Ping Service
- Notes
GENUS CLOCK APPLICATIONS#
Clock Types and Applications#
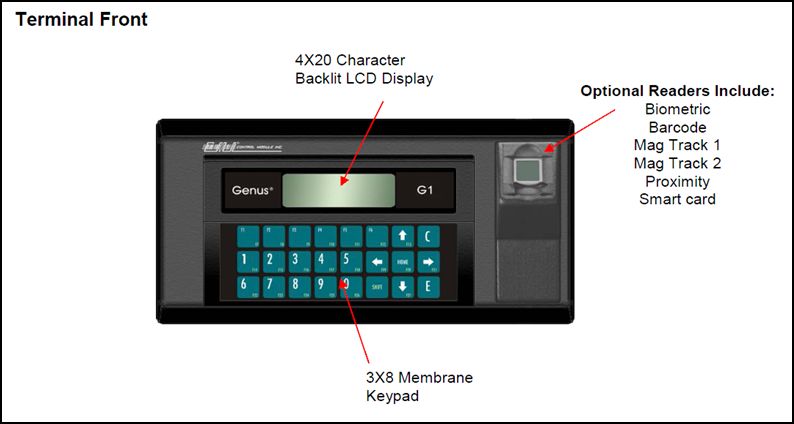
G1 Clock Type#
GenusClockApplication_01.jpg
G2 Clock Type#
GenusClockApplication_02.jpg
- The time clock application will be a set of Java programs that are compiled centrally, packaged and transferred to each terminal as follows:
tftp -i <ipaddress> PUT App.jar \flashdisk\App.jar - There are currently two clock applications with various types of readers. They are all on the same version with each release.
| Application | Supported Readers |
|---|---|
| G1 | Biometric, Magnetic Strip |
| G2 | Biometric, Magnetic Strip, Proximity (Mifare) |
Configuration Attributes#
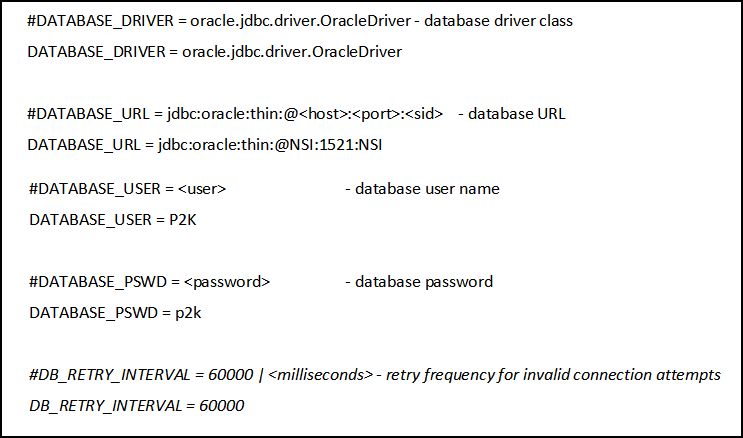
- Parameters and options will be maintained in a central configuration file that can be transferred to the terminals at any time with the following command:
tftp -i <ipaddress> PUT terminal.conf \ramdisk\terminal.conf - This configuration information will initially be held in permanent memory on the terminal and will be loaded into memory only when the time clock is booted(application starts up).
- The following parameters with explanations will be supplied in a configuration file:
#DEBUG = true | false - toggle for debugging
DEBUG = true
Application Configuration#
GenusClockApplication_03.jpg
Terminal Configuration#
GenusClockApplication_04.jpg
Web Configuration#
GenusClockApplication_05.jpg
Database Configuration - NOT USED!#
GenusClockApplication_06.jpg
Loading Clock Software#
- There are four main pieces of software that are required to be loaded and maintained on the clocks.
- Control Module Provided
- Genus files latest version 2.4.3.04
- Class files latest version 1.0.91
- System Provided
- App.conf
- App.jar
- Control Module Provided
- The first two are only required when and if CMI sends out an upgrade. It is suggested that the app be tested on all new versions provided from CMI before a client installs the new software, unless specifically directed by CMI. Notification should be made if that clients are on higher versions when reporting issues found after the install.
- Loading all four pieces of software is preformed via TFTP communication.:
tftp -i <ipaddress> PUT App.jar \flashdisk\App.jar
- Examples:
- tftp -i 192.168.97.168 PUT ..\config\g2_4_3_04 \flashdisk\Genus
- tftp -i 192.168.97.168 PUT ..\config\G2-Classes-1.0.91.jar \flashdisk\Classes.jar
- tftp -i 192.168.97.183 PUT ..\config\app.conf \ramdisk\app.conf
- tftp -i 192.168.97.183 PUT ..\..\..\jar\App.jar \flashdisk\App.jar
- It is suggested to used cmd files to aid in this process and keep track of where the software has been loaded when multiple clocks exist. (Note all spaces in the examples above.)
Clock Rebooting#
- The Genus clocks may require a reboot once in a while to load new software. This is accomplished by either physically unplugging the clock from the power source or loading a new App.jar file.
- If a new app.conf file is loaded, the newly changed attributes will not be respected until a clock reboot has been done.
Usability Configuration#
- The configuration file has had attributes added to help tailor the clocks to get the best performance for users.
- Biometric readers may have the sensitivity settings adjusted to help read difficult finger prints by setting BIO_SENSITIVITY and BIO_QUALITY configuration attributes.
- Mifare card readers may have the poll interval time adjusted using MIFARE_POLL_INTERVAL. This is the time in between card reads. This will speed up or slow down the time the user is required to be holding the card up to the reader.
- Delay times for displaying messages(MSG_TIME), clock idle time (time when no key strokes have been recorded)(IDLE_TIMEOUT) and function completion time before returning to the idle screen (DELAY_TIME) may be set in milliseconds to ensure users have time to read the information on the clock screens.
- Data server communication does have an attribute however only HTTP request types are currently supported. (DATA_SERVER_TYPE)
Functionality#
- The functionality described below is as it pertains to the G2 application and is common to the G1. Functionality not available in the G1 will be identified.
- Some functionality will be configurable with the relevant attribute noted in brackets. The configuration attribute will be found in the app.conf file located in ..\config\app.conf \ramdisk\app.conf mentioned in the clock software section of this document.
Idle Screen#
- The idle screen is the screen which all clocks revert back to when waiting for a user to punch. This screen may include such information as a main title(TITLE), welcome message (WELCOME_MESSAGE), punch IN and OUT(*) prompts(*), verification prompt(*), software version(G2 only), time stamp including date and time.
(*) - Located on function buttons only on the G1: F1-Punch IN, F2-Punch OUT F3-verify, F4-Enroll(**), F5-remove print(if applicable to clock reader) (**), F6-Edit punch(**), F11 - Turn Debug on and off, F12-Memory Capacity Test /Current queue size. - The G2 provides access to the administrator's screen and functions using the F1 key(**).
(**) -These functions are restricted and requires an administrator to enter the admin pass code defined in the configuration file (PASSCODE) before access is granted.
Punching IN and OUT#
- The Genus clocks have designated function buttons enabling the user to identify if they want to punch IN or OUT.
- A user may then be requested to enter a valid cost center code if defined in the configuration file (ENTER_COST_CENTER). The entered code is validated against a list provided in the configuration file (VALID_COST_CENTERS). An error sound and light will tell the user of an invalid entry and the punch attempt is stopped. If a valid cost center code is entered, the user will then be allowed to continue the punch.
- The user will be asked to identify themselves using the reader built into the clock being used. If permitted (ALLOW_KEYING), a prompt will be displayed, stating a badge code may be entered manually to identify the employee. If this is set to 'False', all keying for all employees will be removed. If using a biometric reader, some employees may be unable to record a bio template successfully. If that is the case, the administrator may define specific employees who are allowed to key their badge. (VALID_KEYED_VALUES a comma separated list of badge numbers). All badge values will be validated for minimum and maximum length. (MIN_BADGE_LEN, MAX_BADGE_LEN)
- When an employee badge is keyed or if badge validation is required (VALIDATE_PUNCHES), the entered badge will be sent immediately to the server. An active employment will be searched for using either the person code or the clock card code as defined by (USE_BADGE) .
- Employees may be requested to punch into a specific job (ENTER_JOB). When this is true, the information collected identifying the employee is sent immediately to the server for validation and a list of jobs the employee may clock into is returned to the clock. If the employee has only one assignment, the punch will be recorded and the clock will declare a successful punch recorded. The number of jobs an employee can punch into the G2 clock is limited to 8 (as there are 8 selection buttons).
- If validation is not required, the punch details will be stored into clock memory (the queue) for speed to allow the next user to punch. All details collected within the defined (QUEUE_SLEEP_TIME) are sent to the server. Once the details are stored in the queue a successful completion message is given and the clock is reset back to the welcome screen for the next user.
Employee Verification#
- The Idle screen has a function button dedicated to initiate the employee verification. When pressed, the user is given two choices. One to verify using the reader and the other to enter the employee number.
- Validation using the reader will verify the badge number (Please refer to USE_BADGE attribute.) on the server. Biometric readers will verify that biometric templates exist in the clock memory first then check the server for validation.
- G2 validation is currently limited to ONLY Biometric and Mifare readers and keyed values if the clock contains one of those readers. (HL note: Development required to allow keying regardless of reader type.)
- G1 validation will accept Biometric, Magnetic cards and keyed badge values.
Administration Screen#
- The G2 has a dedicated screen for the administrator holding all functions available. (The G1 admin functions are accessed via the function keys listed in the Idle screen description.) An administrator will be requested to enter the admin pass code as defined in the config file (PASSCODE) loaded into the clock for start up.
- Clocks equipped with biometric readers will have options to Enroll and Remove templates.
- All G2 clocks will have options to Check queue size, Test queue capacity and Clear all.
Enroll#
- The enroll key is used to capture two finger print bio scans referred to as templates and record them into the clock memory. An option to store the print templates on the server is provided in the configuration file (STORE_BIO). If this attribute is false, two templates will be stored on the clock only. The true two templates will be stored on both the clock being used and in the database which the web server points to.
- The template may be verified that it was stored correctly by viewing the ITCC effective record for the badge the templates were enrolled with.
GenusClockApplication_07.jpg If the config file is defined to use the "True" badge, the ITCC clock card code must match the person code and the administrator must use the person code as the badge number when enrolling the employee at the clock. The reason for this is that validation will be looking to the HR identity record using the entered badge and looking for a person code. Since the templates are stored in ITCC, the clock card code must match in order to store the templates.
Remove#
- When 'Remove' is selected, the administrator will be provided with two options. The first is to remove a single employee and prompted for a badge number (Reminder: This may be either a clock card code or person code depending what was used to enroll the employee and what the config file has defined with USE_BADGE.). The templates associated to that badge number will be removed from memory on that clock only. If prints were stored on the server they will remain.
- The second option is to remove ALL templates stored on that clock only. This feature is provided for testing purposes and not recommended for a live clock. The admin will be prompted to enter ten "9's" in a row for confirmation before this is executed.
Check Queue Size#
- This option provides the administrator the ability to get a count of punches waiting in memory to be sent to the server. In most cases this option is used when the server has been down(not available) to the clock for communication. This may be for several reasons such as network, web server or database issues. The clock name and the number of live clock punches in memory will be displayed.
Test Queue Capacity#
- This feature is useful in tuning the clock depending on the use.
Example: If the clock generally has more than 50 employees punching IN/OUT at a time the clock may encounter a high volume of stored punches. In the field, memory could potentially be filled up if a network or database was not available.
This test will identify to the administrator the maximum number of punches before it must shut down and wait for communication to upload. A sample punch will be requested in order to use the correct amount of memory for each punch. The clock will then queue as many punches the clock will successfully record. That number will be made available to the administrator.
- Once the maximum is found each company may decide the maximum memory capacity is not a business practice they would like to allow each clock to hold in cases of emergency. There are two configuration file attributes available to set a ceiling for stored punches where the clock will stop allowing punches and provide a configurable message to the users that a manager must be notified the clock is full. The second is used once communication comes back on line the clock will begin again down loading queued punches. When the queue size reaches the thaw limit, the clock will then become operational and accept punches.
Both attributes are located in the configuration file as QUEUE_LIMIT and THAW_LIMIT. The queue full message is configurable and in the configuration file as QUEUE_FULL, in addition, for the G2 only, a second line is provided as QUEUE_FULL2.
Clear All#
- The Administrator is given the ability to clear all punches in the queue. This is generally used for testing purposes. Upon selection the user will be prompted to enter ten number 9's to confirm the removal of all queued punches.
Clock Ping Service#
- This is a feature which runs transparent to users. Administrators may define a time in milliseconds which the clock will ping the server (PING_SLEEP_TIME).
- Each ping includes the machine name, time, the clock software version.
- The ping information is stored in the device information field of Define Clock Devices ITCD screen.
- If the clock device record was made with data in the device information field previous to the initial ping, that data will be appended to at the end. All xml data received will always be the last appended.

Notes#
Genus clock application project doc is available to create wiki documentation in
FILESERVER\dfs\Publishing\MWalker\HLC Genus Clock Functionality V3
FILESERVER\dfs\Publishing\MWalker\HLC Genus Clock Functionality V3
