CREATING AND MODIFYING A WINDWARD REPORT#
Creating a New Windward Report#
- Create a new Departmental Birthday report
- Add a parameter to select a specific month
- Add a lexicon to the month parameter
- Create a Department Head Count report (based on RENA)
Creating a Birthday Report#
IMFN#
- Step 1
- Create a new function for this report.
Any report run from within Personality must be defined as a function in the IMFN screen. The first two reports will be retrieving data from the HR tables only and is similar to the RENA report.
- Step 2
- Enter REBR for the function name and add a description for this report.
This demonstration will create a report named REBR. This follows our standard report naming convention. The 'R' indicates a read only report. This will not make any changes to existing data within the database. 'E' represents it is a member of the HR (employee) module, and 'BR' is an abbreviation for a Birthday Report.
Since this report is displaying employee information only, it should be part of the HR product group.
- Step 3
- Set the following fields:
- Function Type to ‘Report’
- Usage to ‘User Defined’
- Computer Language to ‘Winward’
- Where Run to ‘Windward’
- Destination Format to ‘PDF’
PDF is the only supported output format at the time this demonstration was written.
- Step 4
- Add at least one user or role that will have execution rights to the new report.
Adding P2K_MASTER will allow P2K to run the report. If this report will prompt to users to enter parameters, both the Retrieve Allowed and Update Allowed toggles must be turned on.
IMFDH#
After the function has been defined in IMFN, go to the IMFDH screen. This screen defines the report parameter screen layout as well as all the tables the report needs access to.- Table Usage tab
- Step 1
- Add P2K_AM_EXECUTIONS in the Data Source field and set the Where Clause field to ‘NEW MEX ID ONLY’
- Step 2
- Add P2K_HR_ASSIGNMENT_DETAILS in the Data Source field
- Step 3
- Set the Table Usage field to ‘User Defined’ for both of these tables.
- Step 4
- If you are creating a report that is accessing the same table twice for different information the Table Alias and Join Clause fields are required for the second occurrence of the table.
- Form Layout tab
- Since we will be adding parameters to the report at a later time, we can ignore the Form Layout tab. This tab is used to define what parameters and filters are presented to the user and where they appear when the report is launched.
- Menu/Drill Downs tab
- The Menu/Drill Downs tab will be used later to add our report to the HR menu. During development and testing of the report we will simply run the report from the command windows within EP.
Report Template#
Once the function and form definition has been saved, a report template will need to be created.- Open MS Word and create a new Rich Text Format RTF document named REBR.rtf. This file is case sensitive; the file name must be in uppercase while the extension must be lowercase.
- Create a title for the new report and insert a table to format the column headings and data of the report. The table only needs to contain three rows with five columns each. Our report will contain the employee name, person code, gender, birth date and age. The entire second row will be blank to provide space between these headings and the data.
http://argo.highlinecorp.com/selfService_AS01/reportdatastructure?NAME=REBR
 This is an example using the AS01 instance in High Line's ARGO application server. The application server and instance name will need to be changed to point to a local environment.
The extension on this URL NAME=REBR is used to identify which tables the report will have access to. Each function will have access to a different set of tables as defined in the IMFDH screen earlier.
Once the XML data source has been defined, Auto Tag will have access to these tables as well as:
- P2K_AM_EXECUTIONS (MEX)
- P2K_AM_EXECUTION_RUN_LOGS (MRL)
- P2K_AM_USERS (MUS)
- P2K_AM_FUNCTIONS (MFN)
- P2K_AM_SITES (MST)
These five tables are added to the data source of all reports generated by High Line and the items within them can be used in the report in the same way as any other item.
If the data source provided to the template only contains one piece of information, it can simply be added to the report using an OUT tag. However, most reports will need to display several rows of information, sorted by one or more items. In this situation, a FOREACH tag will be needed to look through the data to display all the rows that pass the selection criteria defined within Personality.
The Birthday Report needs to group all the employees for a department together and then present these employees alphabetically within each department.
This will require two FOREACH tags to define this sort order correctly. Every FOREACH tag requires an END tag to close it. Failing to add an END tag will cause the report to generate an error when it's processed. Trouble shooting this type of error can be very difficult to do. It is recommended that an END tag be placed in your template immediately after creating a FOREACH tag to ensure each one has a corresponding end.
The basic layout of this template will be:
Training.Create_Winward_Report_01.jpg
Please refer to the REBR.RTF file supplied with this documentation for details.
In order to ensure the consistent formatting of the employee information, a table is suggested for this data. A table of three rows by five columns was created in the template earlier.
- Step 1
- Add the first FOREACH tag on the line immediately above the table, using the Tag Builder in the Auto Tag menu. Each loop requires a selected item and a variable name to be defined. This loop will use the /Data/EASD/DDP_ID/DEPARTMENT_CODE item and should have a variable that identifies this, such as DDP. While not required, it is recommended that all Windward tags be given a nickname. This will be displayed within the template, but will not appear in the report output.
- Step 2
- Add the END tag for this FOREACH loop on the line below the table. This will cause the table to appear and each tag within it to be processed for every department being reported.
The first row of the table will be used to hold the column headings, which must be typed in and formatted as required. In the table properties set the first row to repeat at the top of each page.
The second row of this table is completely blank to separate the column headings from the data within the table. The third row needs another FOREACH tag in the first cell. This will be used to loop through all the employees within each department.
- Step 1
- Select the /Data/EASD/EAS_ID/EEM_ID/EID_ID/FULL_NAME item for this loop with a variable name of NAME.
- Step 2
- Add the END tag for this loop on the line below the table, but before the END tag for the department loop.
Using the Data Bin dialog, add an OUT tag for the FULL NAME, PERSON CODE, GENDER, BIRTH DATE and DRV AGE into each of the five cells of row three.
This last item, DRV AGE, does not actually exist within the P2K_HR_IDENTITIES table. Instead, it is calculated when the data is generated within EP and presented to the Windward report engine. There are a large number of derived fields like this, each with DRV as the first three letters of the item name. Before saving the template, ensure the tag type for the Birth Date column is defined as DATE. Double click this tag to open the Tag Builder dialog and set this correctly. Failing to set it to a date type will display this data as a large numerical value.
- Saving the Template and Running the Report
- Step 1
- After creating the report template, save it as and RTF file named REBR.rtf.
- Step 2
- In Personality, run the REBR report by typing the command into the command window.
- Step 3
- In the report parameter screen that appears, click the folder icon on the line labeled 'Upload Template' and open the template we just saved. This will upload the template and run it for this report once. After the report has completed the RTF file will be deleted from the application server. This option is provided to test the running of report templates prior to permanently uploading them to the application server.
- Step 4
- Click the 'Launch' button to run your report.
Training.Create_Winward_Report_02.jpg
The image shown above is an example of the output generated by this report template.
Adding a Parameter#
Currently, the report will retrieve every employee from the database and report them under the department they are currently working in. While this is useful, it would be more helpful to prompt the user for a specific month or months to report. Since we are restricting the amount of data that Windward needs to process, this must be done within Personality.In order to restrict the quantity of data that needs to be processed a Report List must be created.
- Step 1
- Open the function definition and add P2K_HR_ASSIGNMENT_DETAILS to the subject table field.
- Step 2
- Save this change and immediately add a new record to the IMLQ screen.
Once a subject table has been specified in IMFN, an entry in IMLQ is required for the report to run. Attempting to run the report now will result in the report parameter screen hanging at 'preparing report data'.
- Step 3
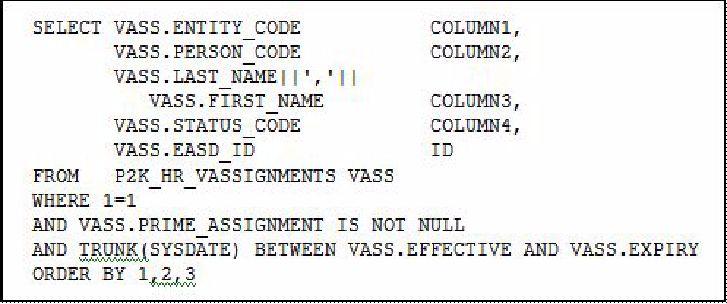
- In IMLQ, edit the automatically generated list of values for IMPV_REBR. Any report defined in IMFN that contains a subject table value will have an entry in IMLQ named IMPV_<function name>. An example that could be used for our report is listed in the IMPV_RENA entry:
Training.Create_Winward_Report_03.jpg
All entries in the IMLQ screen must select five and only five columns from the database. The select statement must be in uppercase and the fifth column must return the ID of the subject table. Other than these restrictions the select statement can be as simple or complicated as needed to restrict the records to a known set. As can be seen in this statement, the table or view that is being used does not need to be the subject table at all. The fifth column in this statement is using the EASD_ID from the VSASSIGNMENTS view to build the report list. The current prime assignments will be the only records added to the report list due to the 'where' clause.
In the IMPM screen, a new parameter can now be defined for this report.

- Step 4
- Select REBR as the function name opening the IMPM screen.
Since this is a new report there will be no parameters listed in the screen initially. Pressing the green plus icon will cause a new parameter to be created named P_MONTH with:
- Prompt of ‘Month’
- Reference of ‘VARCHAR2’
- Data type of ‘Varchar2’
- Parameter length of ‘2’
Turning on the Filter checkmark indicates to Personality that this parameter will modify the SELECT statement in IMLQ. With this checkmark turned on, a Validation Clause is required in the CLAUSE tab of the IMPM record.
TO_CHAR(BIRTH_DATE, 'MM') IN (<LIST>)
Adding the code segment shown above will allow the user to enter one of more, 2 character months as a qualifier for the report list.
The final step is to add this parameter to the report parameter definition within the IMFDH screen.
- Step 5
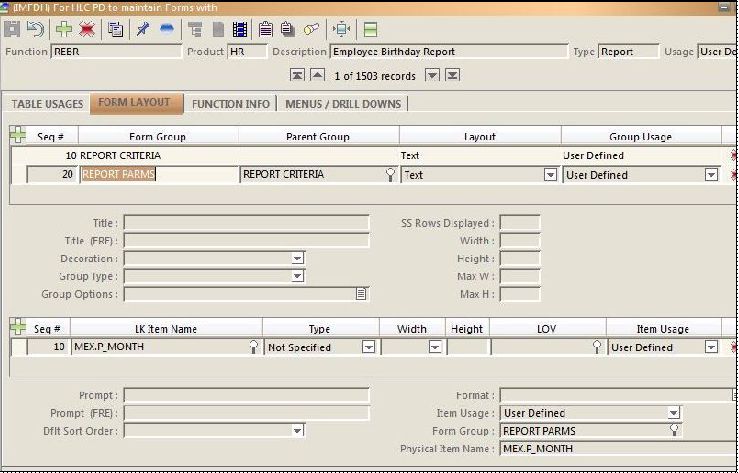
- Open IMFDH and edit the Form Layout tab of the REBR function.
Training.Create_Winward_Report_04.jpg
This will require the user to manually key in the two digit month in order to run the report. By making a simple change to the parameter defined in IMPM, a lexicon list can be offered to the user to select the month or months to report.

Add a Lexicon for Parameter Selection#
In IMPM, for the P_MONTH parameter of REBR, replace the VARCHAR2 in the Reference column with X_REG_EMPLOYMENT_DATE.This is a pre-existing lexicon, provided by High Line for use in another report. We can make use of it in our report to present a list of months. When the user selects a month, the corresponding two digit month number will be passed to the IMLQ report list selection statement.
Department Head Count#
An alternate method of creating a report is to start with an existing report and modify it. In this example, we will make a copy of the RENA report and alter it to produce a Departmental Head Count.- Step 1
- Start by opening the IMFN screen and selecting the RENA report.
- In the lower portion of the screen, click on the Copy Function and Form button. This will display another dialog with a new function name suggested.
- Since our report will not 'extend' the RENA report, change the function name to REHC to represent Report Employee Head Count.
- Leave the checkmark turned on for Copy as User Defined and press OK.
- Step 2
- Once the new function has been created, select it in IMFN and remove RENA from the Extends field. Failing to remove this entry will cause any user running RENA to run our report instead. The new function will have a new set of tables defined in IMFDH, as well as a form layout definition. All the parameters will have been copied to our new function and a report list query created on IMLQ. If needed, any of these screens can be edited to alter the report to our needs. For this example we will leave them unaltered.
- Step 3
- Open MS Word and created a new RTF file that matches our new function name, REHC.rtf. Again, ensure that the file name is in uppercase while the extension is lowercase. Both Personality and the Windward report engine are case sensitive when it's looking for the report template file.
- Step 4
- In the Auto Tag menu, define the data source for our new report:
http://argo.highlinecorp.com/selfService_AS01/reportdatastructure?NAME=REHC
Again, this is only an example. Both the application server and Self Service instance name will need to be changed to a local environment.
The Windward report engine does not contain any functions or tags to generate totals in a report. Instead, the template will need to track the records that are processes and display these totals as they're needed. It will also need to reset one counter and start counting again during control breaks. Counters can be created anywhere in the template before looping through the data with a FOREACH tag. A SET tag is used to define a variable name and give it an initial value. A nickname is also suggested for these tags. This report will need two SET tags, one for the department total and a second for the grand total.
The entire report will be displayed in a table, five rows long by three columns wide.
- Step 5
- Above a 3x5 table add two SET tags from the Tags drop down menu of the Auto Tag rib¬bon. One named 'setGT' with a variable name of GrndTotal and second named 'setDT' with a variable name of DeptTotal, both with a value of 0. These variables will be used later to count the number of records processed.
- Step 6
- Also above the 3x5 table, create the first FOREACH tag. In the sample template this loop is named 'eachDEN' with a variable name of DEN. Ensure the following item is selected for the tag:
/Data/EASD/EAS_ID/EEM_ID/DEN_ID/ENTITY_CODE
The first cell of the first line will contain the entity code label and an OUT tag for this data. Ensure the item that is being displayed is the ENTITY_CODE from /Data/EASD_ID/EEM_ID/ DEN_ID. This is the entity code associated to the employee.
In each of the cells of the second row, enter the column headings for the report; Department Code, Department Name and Count. The third row will be left blank to provide space between the headings and the data.
The fourth row contains the majority of the tags. The first cell will hold two tags. The first is a FOREACH tag to loop through the department codes and an OUT tag to display it. Both will have the same item selected:
/Data/EASD/DDP_ID/DEPARTMENT_CODE
The second cell of row four will have five tags:
- The first is an OUT tag to display the department name. This item is located under the DDP_ID/ID item in EASD: /Data/EASD/DDP_ID/ID/DEPARTMENT_NAME.
- After the OUT tag another FOREACH is needed to loop through all the assign¬ment details associated to this department: /Data/EASD.
- Inside this loop the variables defined at the top of the template will need to be incremented. This is done with another pair of SET tags. These two tags can have new nicknames to identify them but must have the same variable name defined for the original SET tags. Also they will contain an expression instead of a value. The expression to increment the DeptTotal is: ${DeptTotal}+1, while the expression to increment the GrndTotal is: ${GrndTotal}+1.
- Finally we close this loop with and END tag.
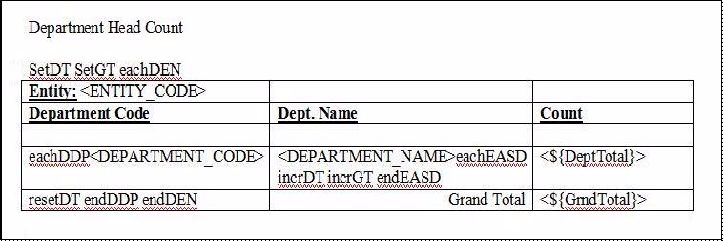
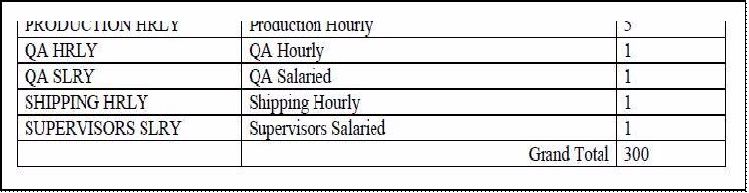
The last row of the 3x5 table is used to rest the department counter, end all the loops and display the grand total of the report.
In the first cell add another SET tag with a value of 0 and a variable name of DeptTotal. Since this is after the count has been displayed and before it processes the next department, it will need to be reset to zero again. Also in this cell both loops need to be closed. Create two END tags, one for the department loop and one for the entity loop.
The second cell of row five simply contains the table for our grand total, while the last cell contains an OUT tag for this total.
Training.Create_Winward_Report_05.jpg

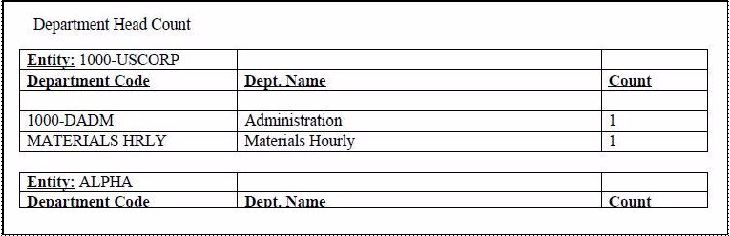
The following two images show sample output from this report when run from Personality.
Training.Create_Winward_Report_06.jpg

Training.Create_Winward_Report_07.jpg

Modifying a Winward Report#
- Remove the Termination date and Status from the RENA report.
- Add the employee's gender.
- Alter the data provided to RENA to exclude terminated employees.
- Replace the existing report with our modified version.
Since most users will not have access to the application server, a copy of the RTF template will need to be downloaded to your client system for editing. We will upload this template each time it's needed for testing purposes. Once a final copy of the RTF template is ready, it can be moved into another directory that is used for custom reports. We will use the RENA.rtf file as our starting point and modify this.
- Step 1
- Extract a copy of the file from High Line's ZIP file and rename it to RENAC.rtf.
- Step 2
- After Windward's Auto Tag plug in has been installed, the license key entered and the report template has been placed on the client system, open the RTF file.
- Step 3
- After opening, the first change that will be needed is to define the data source for this report.
- From the Auto Tag menu, select Data/Data Sources.
- In the dialog box that appears, select the XML data source listed and click edit.
- If no data source is listed, simply click the add button.
- Ensure the vendor field is XML (file or url) and edit the File/URL field to point to the following URL:http://argo.highlinecorp.com/selfService_AS01/reportdatastructure?NAME=RENAC
Please note the URL shown above is an example only. You will need to alter this URL to point to your application server and Self Service instance.
This URL is another entry point into the Self Service component of High Line's Personality application. This URL simply provides the XML format of the data that will be provided to the Windward report engine when the specified function is run. Auto Tag requires a data structure to provide a list of item that can be added to the report from its Data Bin.
- Step 4
- Before exiting the Data Sources Edit dialog, press the Test button in the lower left to ensure Auto Tag is able to communicate with the URL specified. If communication is not successful you will not be able to edit the report template correctly.
- Step 5
- Once communication has been established pressing OK will return you to the Data Sources.
The list of items shown in the data sources dialog should now contains several table aliases that can be expanded.
- If the EASD table is not listed edit the data source again and correct the URL.
- If the URL is correct ensure the function has been saved correctly within the application.
The EASD entry will include all the database columns associated to the P2K_HR_ASSIGNMENT_DETAILS table. Within this list of items is EAS_ID. Expanding this item will display all the columns associated to the P2K_HR_ASSIGNMENTS table. From this list we can continue to navigate up the data hierarchy to P2K_HR_EMPLOYMENTS and again to P2K_HR_IDENTITIES. Using this method of data navigation we can also branch out to other tables for department information, unit and group data, as well and the employee's personal information.
Many of the field tags added to the template file by High Line will be visible in the report template. However most will not produce any output in the actual report. The only tags that produce output when run are <OUT> tags. Simply placing the mouse over a tag should display a tool tip for that tag. Since many of the tags created in the RENA report are larger than the cell that has been defined to display the data, the template may not look like the final report. For example, the start of the <OUT> tags for the employee information is at the top of page three in the RTF file but will actually print at the top of page two.
- Step 6
- To remove the Termination date and Status code, highlight the column label and the <OUT> tag that corresponds to these fields and press delete. Alternately you can place your cursor at the end of this line and simply back space to remove the tags and field labels.
- Step 7
- Type a label for the new field we will be adding. In this example, we will label this Gender and then add the GENDER tag from the Auto Tag data bin. To add this tag you will need to expand the EASD table alias. This will display all the columns in the ASSIGNMENT DETAILS table. Expanding the EAS_ID item will display all the columns associated to ASSIGNMENTS. Expanding the EEM_ID item will display the EMPLOYMENT columns. Finally expanding the EID_ID item will display the columns in the IDENTITIES table, includ¬ing GENDER. Click and drag this item onto our report next to the label that was typed in earlier.
- Step 8
- Save the report and connect to Personality as a user authorized to run RENA.
- Once connected type RENA in the command window, or select it from the report drop down menu. Since this function was extended earlier in the IMFN screen, running RENA will actually run RENAC.
- Fill in any parameters you like to limit the number of people included in the report and then go to the Report Options tab of the report parameter screen.
- In this tag click the folder icon next to the 'Upload Template' line.
- In the file upload dialog box that appears, navigate to the copy of the RENAC.rtf file you have altered and open it. This will place the file name into the Upload Template field.
- Click the Launch button to run your report.
If there are no errors in the RTF file the report progress bar will display feedback as the report runs.
- Step 9
- When your report completes, click on the Output link to display the PDF output. You can confirm that your template was using by scrolling down to any employee and confirming that both the Term and Status fields have been replaced by the employee's gender.
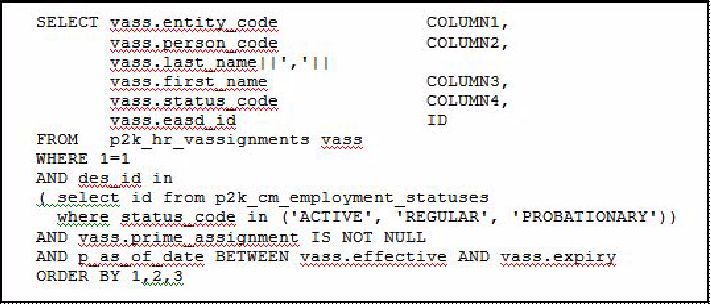
The SQL statement provided by High Line is:
Training.Create_Winward_Report_08.jpg
The new statement is:
Training.Create_Winward_Report_09.jpg
The only difference in these two statements is the addition of:
Training.Create_Winward_Report_10.jpg
This sub-query will restrict the records reported to only employees that have an employment status of ACTIVE, REGULAR or PROBATIONARY. This will eliminate all terminated and inactive employees from our report.
The final step to complete this report is to add the report to the application server, removing the need to upload the template each time we want to run the report. In order to add the report to the application server our custom RTF file will need to be moved into the UserDefined directory in HLAppResources/reports. This will require a user with write permission in this directory. We can test this again by running the RENAC report and not uploading our modified version. The Windward report engine should pick up the new template from this directory and run successfully.